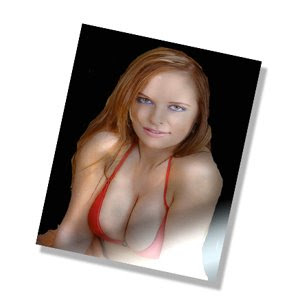
Tuesday, April 29, 2008

Wednesday, April 23, 2008

PIMPLE POPPING MADE EASY


Pimples, or zits (slang name) can be mild UP to severe. Its a common skin condition and can affect anyone from teenagers to women in there LATER YEARS.

Its rare to find acne in men of that age range. Acne, the full medical term is acne vulgaris is a common skin condition that happens when skin cells are clogged with oil and dead skin and then is infected with bacteria.

A pimple is red and is often raised bump like on the skin affecting the face, neck, shoulders, and back area. If a pimple bursts under the skin and sends bacteria into the surrounding tissues, it is then called a papule.

If the papule goes even deeper under the skin, its called a pustule. It might not be as red as other pimples but may have a white enter and be very painful. If it goes even deeper in the skin, it is then called a cyst or boil. These are very serious and should be treated by a trained professional who will administer topical remedies to help clear it up.
By picking or squeezing, you can add additional bacteria into the area and make the outbreak worse instead of better. Your hands or fingers may carry bacteria that you dont even know about that can aggravate the condition of your pimple. A good rule to remember is to keep your face clean and your hands very clean and off your face.

But. if you can't resist you can REDUCE the pressure with a squeeze ....

1. WASH YOUR DIRTY ASS HANDS WITH SOAP AND WATER,(ESPECIALLY IF YOU JUST FINISHED TAKING A CRAP ).

2.POSITION "INDEX" FINGERS ON EACH SIDE OF ZIT.....(NOTE: CLIP YOUR NAILS TO REDUCE SLICING INTO SKIN).

3. APPLY EVEN (SLOW) PRESSURE TO "POP" PRESSURE...(TELL ANYONE CLOSE TO YOU TO COVER THEIR MOUTHS)

4. AIM AWAY FROM PEOPLE AND PETS ....

5. YOU WILL BE FINISHED WHEN YOU HEAR GASPS, SCREAMS AND PUKING SOUNDS COMING FROM WITNESSES.


END RESULT : SO WHAT COMES OUT ????<

DEAD SKIN CELLS , WHITE BLOOD CELLS , INFECTION

HAVE FUN !!!!

Sunday, April 20, 2008

REALISTIC PHOTO PRINT EFFECT

Step 1:
First create the thin border of the photograph OR image you choose.
Use the Rectangular Marquee Tool to draw a rectangle the shape of a photo.
Create a new layer and call it frame, fill the selection with a gradient going from white to beige (#F7F2E7) like in the picture below.

Or whatever shade coloring you are looking for.


Step 2:Create a new layer and call it mask, with the selection still active shrink the selection by 4 - 6 px.
Fill the selection with whatever color you like, we will use this layer as a layer mask for our real picture in the next step.


Step 3: Insert the image you want to use to create realistic photo, make sure the image is in a layer above the mask layer.
Hold down the Alt button and position the mouse between the mask layer and the picture layer, the mouse pointer should look like the picture to the left, now left click.

Your image should now only be visible inside the rectangle you created in the mask layer.Now you can resize and move the image as you like inside this rectangle.

Now you can resize and move the image as you like inside this rectangle.

Step 4:Create a new layer and call it white gradient, set the foreground color to white, select the gradient tool and open the gradient editor.
Select the gradient called “Foreground to Transparent” which should be in your presets list.
Click the left Opacity stop and set the opacity to 50% as demonstrated in the picture bellow.
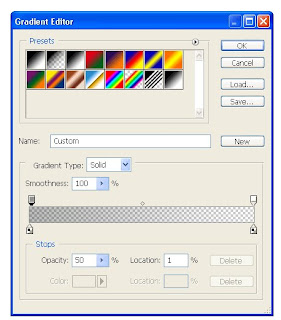


Step 5
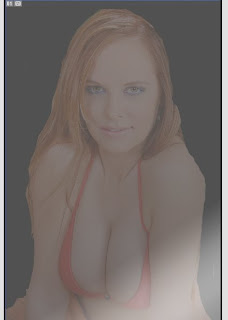
:Draw a gradient from the bottom right corner towards the upper left corner as demonstrated in the image bellow.
Change the foreground color to black and create a new layer and call it black gradient now create the same gradient but in the opposite corner.


Step 7:Instead of applying a basic drop shadow we will create a more realistic shadow.
Start by creating a new layer called shadow and place the shadow layer below the frame layer, click the frame layer preview.Right click the selection and select Make work path, set the tolerance to 10.

Step 8:Select the Path selection tool and add an anchor point on the right and bottom side of the path, to add an anchor point you simply right click the path and select Add anchor point.
Move the anchor points.


Step 9:Right click the path and select Make selection to transform it back to a selection.
Fill the selection with black and deselect by hitting ctrl + D, set the layer opacity to 50% and apply a gaussian blur (Filter > Blur > Gaussian blur) with about 6px in radius.


LATEST STICKER DESIGNS

NEW UPLOADS AND ADDITIONS :
CLICK HERE

Monday, April 7, 2008

PhotoShop Trick : Easy Reflection Effect


I am going to show you how you can add reflections to your text, shapes or objects. This is a very easy technique and can be used in web design or interesting photo effects.

As an example, I will add a reflection to some text, however you can also use the same technique to add reflections to shapes or objects.

The first step is to duplicate our text layer. You can do that by simply going to Layer - Duplicate layer.


You can also add a bit of perspective or not to the reflection layer by transforming it (Edit->Transform->Perspective) if you want.Flip this layer by using Free Transform/ Flip vertical.


The next step is to add a layer mask to the duplicate layer. To do this simply click on the add layer mask button in the layers palette.
add layer mask button


Now pick the Gradient Tool and draw a gradient (black to white) in the direction that the arrow is showing in the screenshot .
(SEE EXAMPLE BELOW)


Finally just reduce the opacity of the duplicate layer and you are all done. I reduced the opacity and here is my final result.

There is no set rules in using this technique......experiment with the opacity to set the effect you are looking for.


FINAL RESULT .....

NEW DECALS


NEW DECALS ADDED

Tuesday, April 1, 2008

TOP FUNNY DECALS


1. LOVE THY NEIGHBOR....JUST DON'T GET CAUGHT

2. DON'T LITTER.. JUST SHOVE IT UP YOUR ASS

3. HAVE A NICE DAY .... ASSHOLE

4. 100% AMERICAN BUSH

5. P.M.S EQUIPPED